Kubernetes on the Apple Silicon
The last weeks were amazing. After Apple begins shipping their brand new hardware, the IT-Community is on Silicon fire. The M1 family is a big step forward, and driving the ARM System on Chip design in new dimensions. Developers are porting around the globe their projects and applications on the Silicon. The Cloud Native Community is preparing their container images to multi arch binaries! Docker announced the Docker Desktop 3.0 release on 2020/12/10. In the Docker Developer Preview you can download the first Docker M1 Silicon preview. Now the really exciting thing: Docker CLI plugin buildx to create Multi Arch Container Images fast in parallel, is on the Docker release 20.10 GA available. Yeah…
Nice time to try out Kubernetes on Silicon. Over the past five years I’ve gained a lot of experience with Kubernetes on ARM. Setting up an ARM based Kubernetes cluster with multiple Raspberry PIs, RockPIs, Banana PIs, Asus Tinkerboard S or ODROID is an adventure. Every year the ARM support geets better, but now a new area of community growth is started.
Bee prepared :)
Hands on Kubernetes
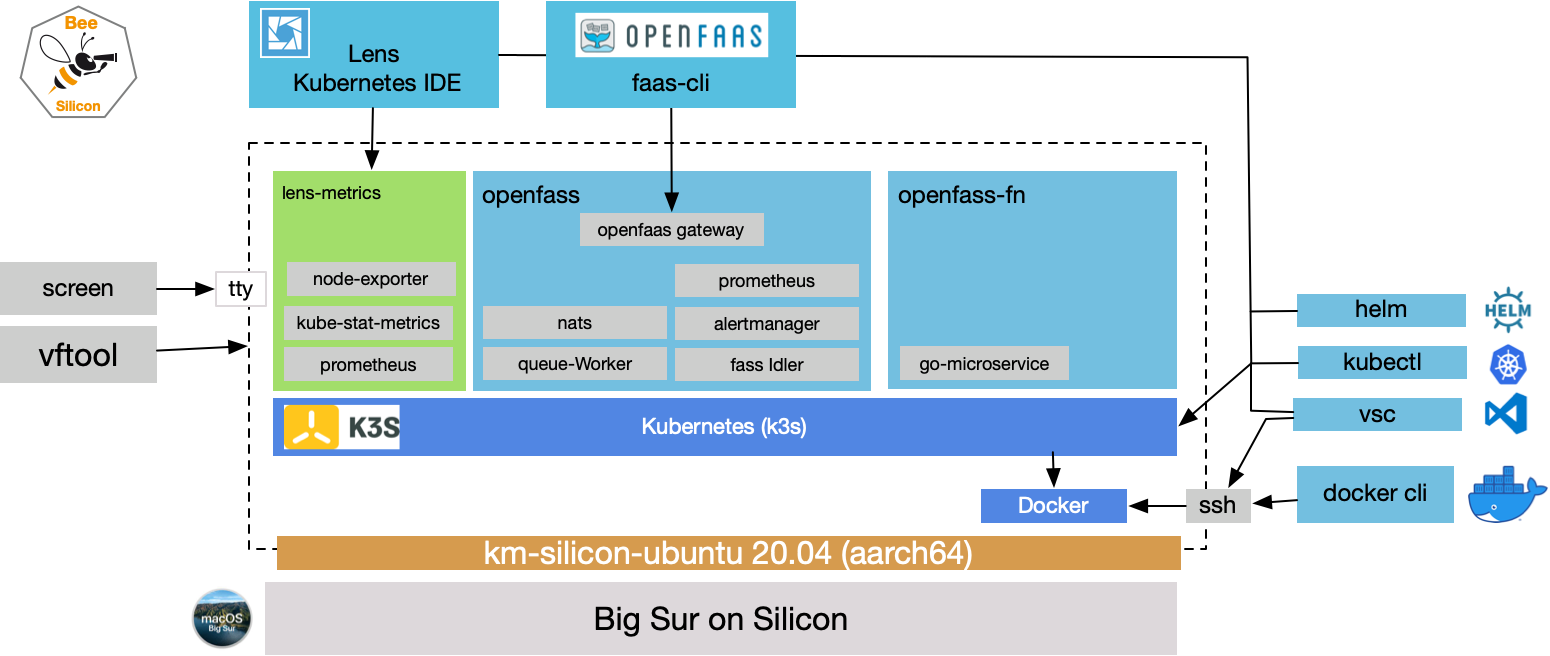
Before you can start your ARM container journey, you need to prepare the Silicon a little bit. First you’ll need some CLI tools and a Linux virtual machine. You can find more information in the Containerized the Apple Silicon tutorial. Now you can start multiple VMs to create a Kubernetes cluster.
I hope you have successfully installed Intel brew and the vftool otherwise read tutorial.
Then install some tools on your silicon:
$ ibrew install wget qemu-img
Create your km-silicon box
- Download the ubuntu linux images and prepare your VM disk:
$ RELEASE=focal
$ VERSION=20.04
$ URL=https://cloud-images.ubuntu.com/releases/$RELEASE/release/
$ mkdir -p ~/develop/ubuntu-$RELEASE-$VERSION
$ cd ~/develop/ubuntu-$RELEASE-$VERSION
$ wget $URL/unpacked/ubuntu-$VERSION-server-cloudimg-arm64-vmlinuz-generic
$ wget $URL/unpacked/ubuntu-$VERSION-server-cloudimg-arm64-initrd-generic
$ wget $URL/ubuntu-$VERSION-server-cloudimg-arm64.tar.gz
$ mv ubuntu-$VERSION-server-cloudimg-arm64-vmlinuz-generic vmlinux.gz
$ gunzip vmlinux.gz
$ mv ubuntu-$VERSION-server-cloudimg-arm64-initrd-generic initrd
$ tar xvfz ubuntu-$VERSION-server-cloudimg-arm64.tar.gz
$ mv $RELEASE-server-cloudimg-arm64.img ubuntu-$VERSION-km-disk.img
# Let the disk space growing...
$ qemu-img resize ubuntu-$VERSION-km-disk.img +50G
- Start the VMs to set up the box:
$ vftool \
  -k vmlinux \
  -i initrd \
  -d ubuntu-$VERSION-km-disk.img \
  -m 2048 \
  -a "console=hvc0"
Connect to the vm console on the second terminal:
$ screen /dev/ttys002
> mkdir /mnt
> mount /dev/vda /mnt
> chroot /mnt

> touch /etc/cloud/cloud-init.disabled

> echo 'root:12345678' | chpasswd

> echo "km-silicon" >/etc/hostname
> ssh-keygen -f /etc/ssh/ssh_host_rsa_key -N '' -t rsa
> ssh-keygen -f /etc/ssh/ssh_host_dsa_key -N '' -t dsa
> ssh-keygen -f /etc/ssh/ssh_host_ed25519_key -N '' -t ed25519

> cat <<EOF > /etc/netplan/01-dhcp.yaml
network:
    renderer: networkd
    ethernets:
        enp0s1:
            dhcp4: true
    version: 2
EOF

> exit
> umount /dev/vda
- Start the fresh VM to install Kubernetes:
Add more memory, cpu power and the disk.
$ vftool \
  -k vmlinux
  -i initrd \
  -d ubuntu-$VERSION-disk.img \
  -m 4096 \
  -p 2 \
  -a "console=hvc0 root=/dev/vda"
- Open the console again on the second terminal and login as root:
# paste your ssh key for later copy.
$ cat –/.ssh/id_ed25519-peter.pub | pbcopy
$ screen /dev/ttys002
# login as root
> uname -a
Linux km-silicon 5.4.0-54-generic #60-Ubuntu SMP Fri Nov 6 10:42:16 UTC 2020 aarch64 aarch64 aarch64 GNU/Linux
> ip addr show | grep "inet 192"
    inet 192.168.64.12//24 brd 192.168.64.255 scope global dynamic enp0s1
> resize2fs /dev/vda
Copy your SSH key so that you can easily connect to the ** km-Silicon ** box.
> mkdir ~/.ssh
> cat  >~/.ssh/authorized_keys <<EOF
<<paste ssh pub key>
EOF
Congratulation again!
Install Kubernetes to km-silicon
Now there are many options to install Kubernetes on your silicon.
I’ve had good times with k3s, its stable, well tested and lightweight. I like the K3sup CLI installer tool too.
$ ibrew install kubernetes-cli k3sup
Don’t forget to add you new km-silicon machine to your ssh config.
$ vi ~/.ssh/config
Host km-silicon
     HostName 192.168.64.12
     User root
     IdentityFile ~/.ssh/id_ed25519-peter
$ chmod 600 ~/.ssh/config
Please install the k3s with docker as container runtime. Then you can use the km-silicon box more easily for container image builds.
$ export IP=192.168.64.12
$ mkdir -p km-silicon ; cd km-silicon
$ k3sup install --ip $IP \
  --k3s-extra-args '--docker' \
  --user root --ssh-key ~/.ssh/id_ed25519-peter
Running: k3sup install
2020/12/07 06:30:56 192.168.64.12
Public IP: 192.168.64.12
After a minute you will be able to access the fresh Kubernetes Cluster. Feel free to add more nodes.
$ export KUBECONFIG=`pwd`/kubeconfig
$ kubectl get node -o wide
NAME         STATUS   ROLES    AGE   VERSION        INTERNAL-IP    EXTERNAL-IP   OS-IMAGE             KERNEL-VERSION     CONTAINER-RUNTIME
km-silicon   Ready    master   14s   v1.19.4+k3s1   192.168.64.12  <none>        Ubuntu 20.04.1 LTS   5.4.0-54-generic   containerd://1.4.1-k3s1
Start the first kubernetes load
$ kubectl run whoami --image=traefik/whoami:v2.3.4
$ kubectl get pod
NAME     READY   STATUS    RESTARTS   AGE
whoami   1/1     Running   0          2m37s
$ kubectl port-forward whoami 8081:80 &
$ curl 127.0.0.1:8081
Handling connection for 8081
Hostname: whoami
IP: 127.0.0.1
IP: ::1
IP: 10.42.0.9
IP: fe80::e8cd:1bff:fe9c:a5ed
RemoteAddr: 127.0.0.1:46784
GET / HTTP/1.1
Host: 127.0.0.1:8081
User-Agent: curl/7.64.1
Accept: */*
Ready for to do multiple things more…. :)
Connect Kubernetes UI
If you install Visual Studio Code, add the Kubernetes and Docker extensions.
Then you can use the kubeconfig file to connect to the km-silicon Kubernetes cluster.
You need more comfort?
Please, download and install Lens or k9s.
Lens is a really nice Kubernetes IDE. I like this.
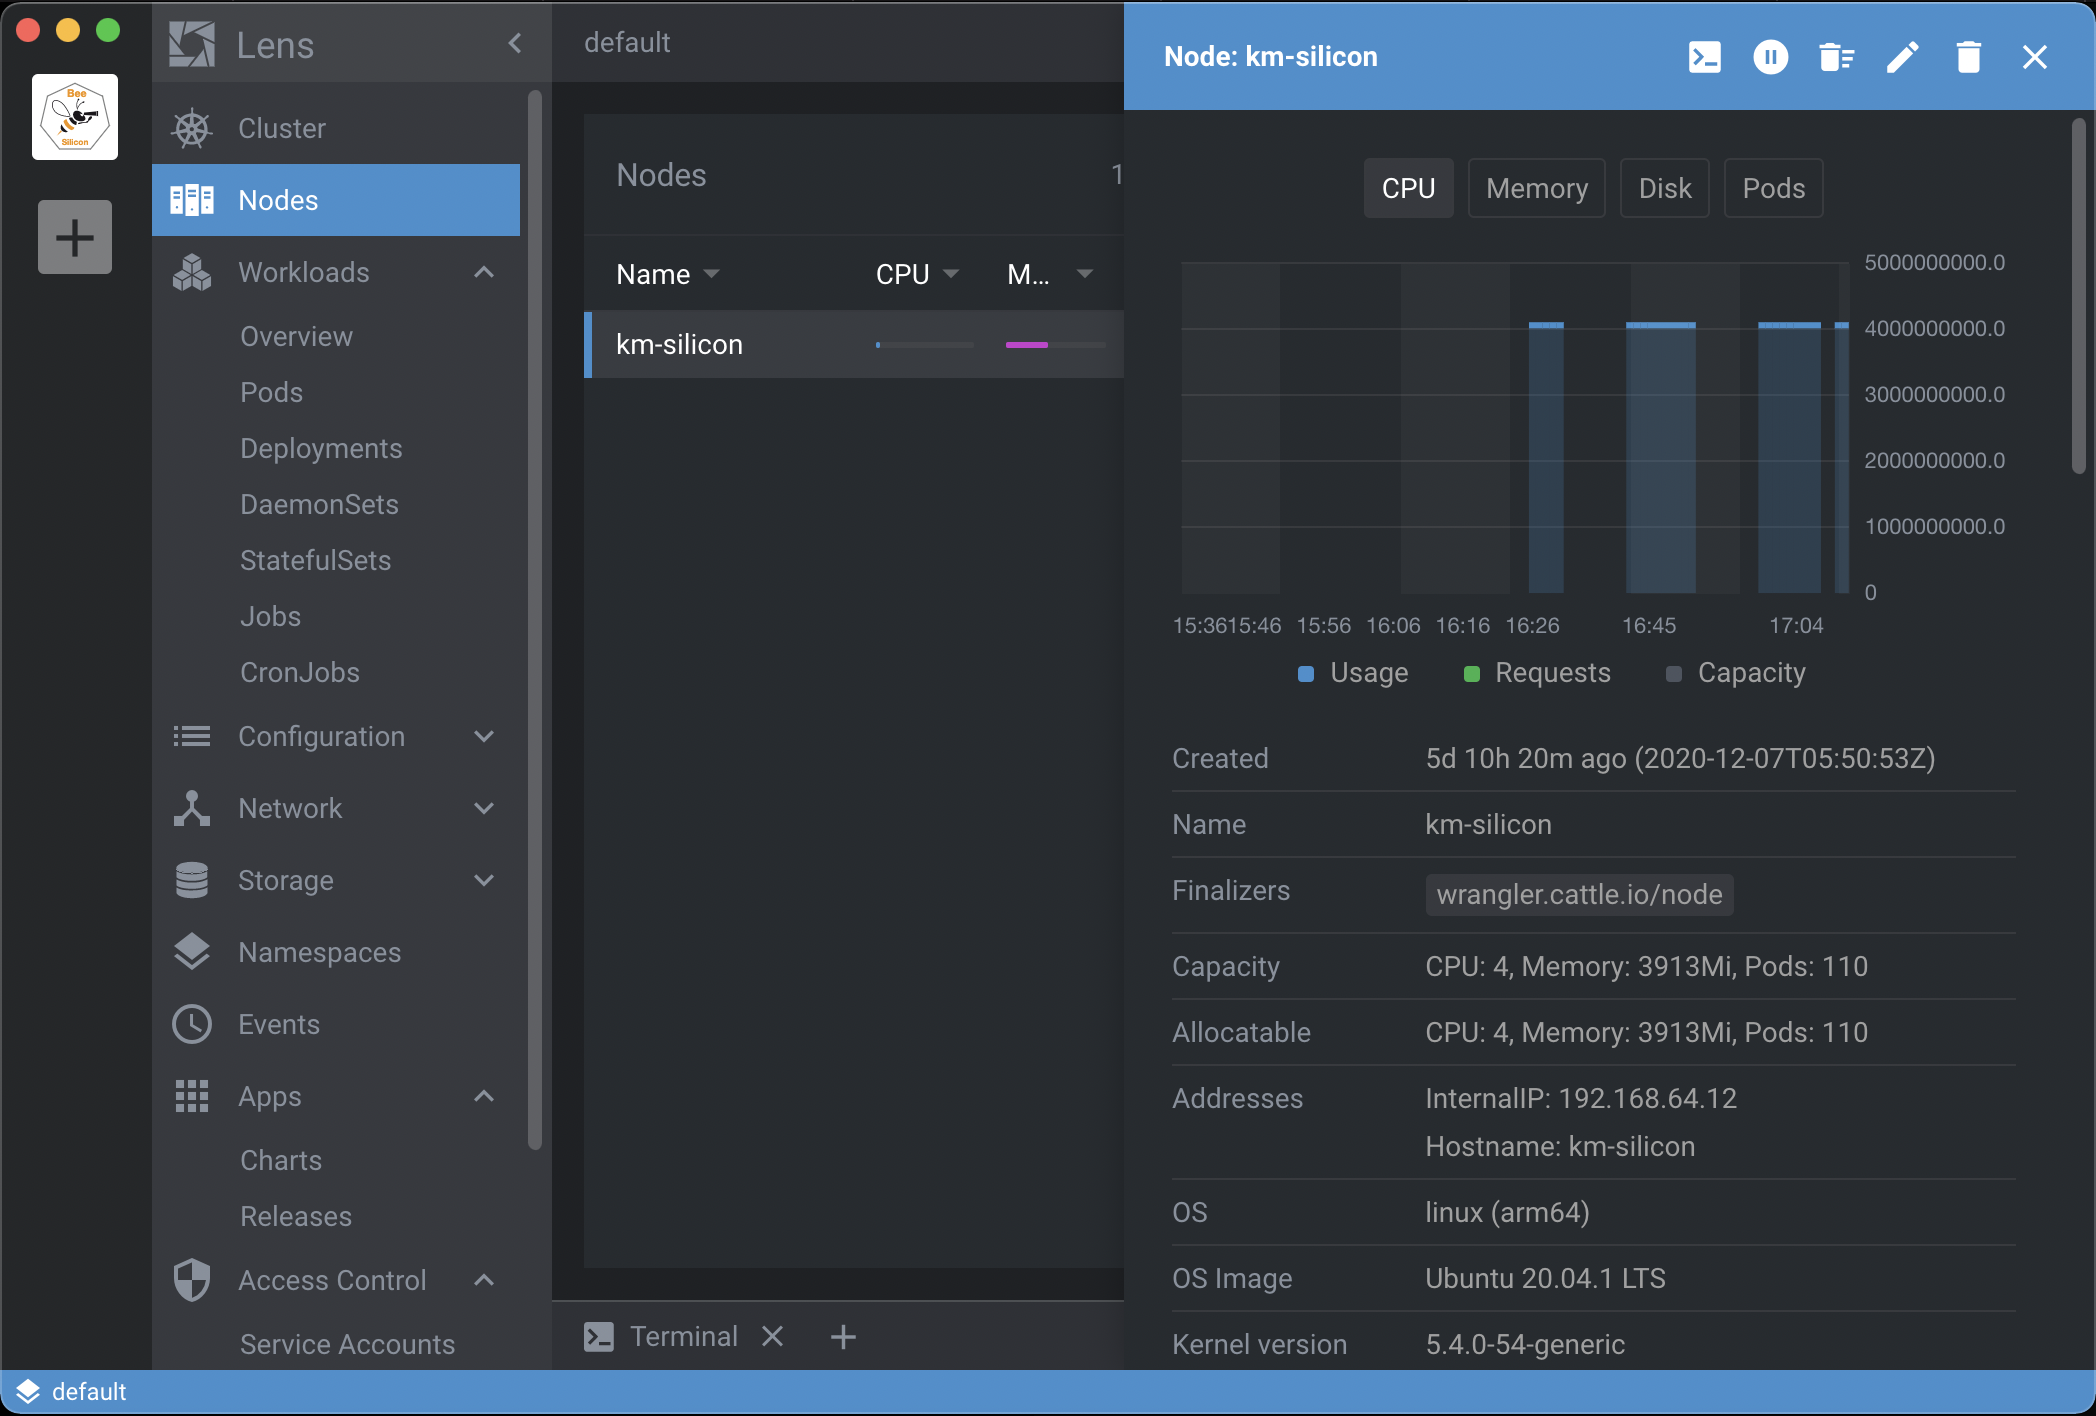
After you’ve added the `km-silicon* Kubernetes cluster, the config needs some help and tweaking.
- Add the Bee Silicon logo :)
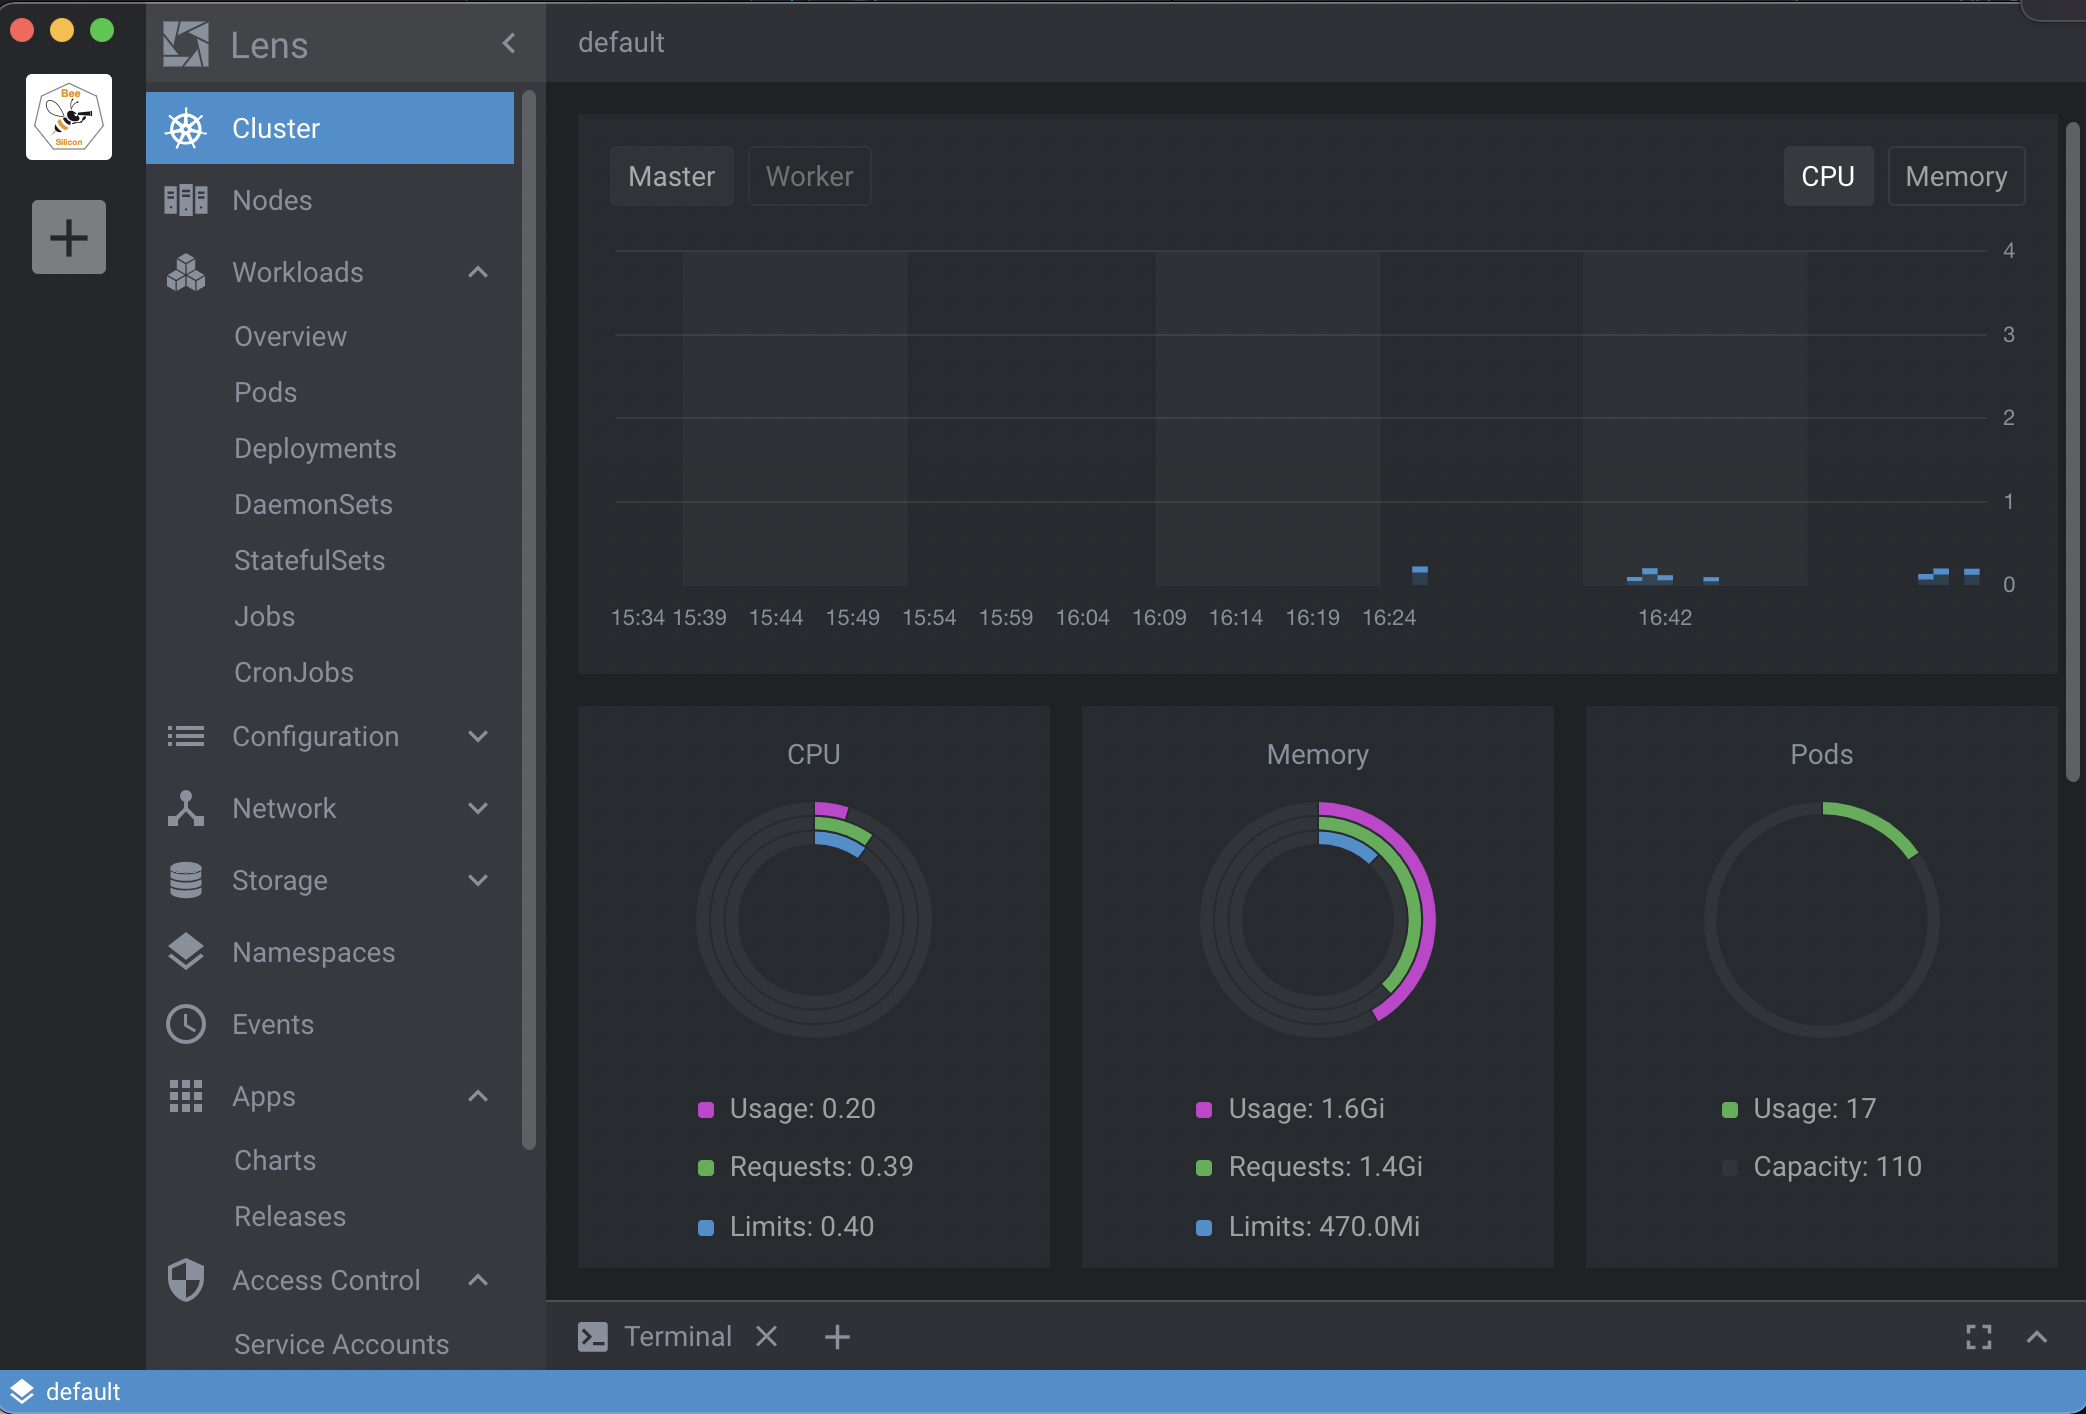
- Start the metrics service
Arrg, the kube-state-metrics pod only support amd64.
$ kubectl -n lens-metrics get all
NAME                                     READY   STATUS    RESTARTS   AGE
pod/kube-state-metrics-c9579d6ff-krtj4   0/1     Pending   0          2m18s
pod/node-exporter-4jspm                  1/1     Running   0          2m18s
pod/prometheus-0                         1/1     Running   0          2m17s

NAME                         TYPE        CLUSTER-IP      EXTERNAL-IP   PORT(S)    AGE
service/kube-state-metrics   ClusterIP   10.43.101.111   <none>        8080/TCP   2m18s
service/prometheus           ClusterIP   10.43.142.212   <none>        80/TCP     2m18s
service/node-exporter        ClusterIP   None            <none>        80/TCP     2m18s

NAME                           DESIRED   CURRENT   READY   UP-TO-DATE   AVAILABLE   NODE SELECTOR   AGE
daemonset.apps/node-exporter   1         1         1       1            1           <none>          2m18s

NAME                                 READY   UP-TO-DATE   AVAILABLE   AGE
deployment.apps/kube-state-metrics   0/1     1            0           2m18s

NAME                                           DESIRED   CURRENT   READY   AGE
replicaset.apps/kube-state-metrics-c9579d6ff   1         1         0       2m18s

NAME                          READY   AGE
statefulset.apps/prometheus   1/1     2m18s
- Edit the kube-state-metrics deployment with lens IDE or kubectl edit:
…
template:
   metadata:
     creationTimestamp: null
     labels:
       name: kube-state-metrics
   spec:
     containers:
       - name: kube-state-metrics
         image: 'k8s.gcr.io/kube-state-metrics/kube-state-metrics:v2.0.0-beta'
…
affinity:
       nodeAffinity:
         requiredDuringSchedulingIgnoredDuringExecution:
           nodeSelectorTerms:
             - matchExpressions:
                 - key: kubernetes.io/os
                   operator: In
                   values:
                     - linux
                 - key: kubernetes.io/arch
                   operator: In
                   values:
                     - arm64
             - matchExpressions:
                 - key: beta.kubernetes.io/os
                   operator: In
                   values:
                     - linux
                 - key: beta.kubernetes.io/arch
                   operator: In
                   values:
                     - arm64
     schedulerName: default-scheduler
…
- Fix the image to use a multi arch container image like
k8s.gcr.io/kube-state-metrics/kube-state-metrics:v2.0.0-beta - Set up the the node selector constraint from amd64 to arm64 or remove it!
- Save the results
- Wait some minutes and all dashboard are filling with graphs…
Time to start OpenFaas development
Next week, the OpenFaas community will celebrate its 4th birthday on 18th December 2020 1700 GMT.
It is the right time, to think differently. Accept that the serverless style of programming is part of the cloud native future.
To create new functions, you need Docker to create the container images. Cool that we activated Docker runtime on K3S and setup a ssh connection on km-silicon.
Set up a Docker context to km-silicon.
$ docker context create km-silicon --docker "host=ssh://root@192.168.64.12"
$ docker context use km-silicon
Install and use OpenFass at Kubernetes.
Start to install faas-cli and helm. The default OpenFaas installation with arcade doesn’t work right now, but I found a setup.
$ export KUBECONFIG=`pwd`/kubeconfig
$ ibrew install faas-cli helm
$ helm repo add openfaas https://openfaas.github.io/faas-netes/
$ helm repo update
$ kubectl apply -f https://raw.githubusercontent.com/openfaas/faas-netes/master/namespaces.yml
$ helm pull openfass/openfass
$ cd openfaas
$ helm upgrade openfaas --install .
   --namespace openfaas
   --set functionNamespace=openfaas-fn
   --set generateBasicAuth=true
   --values values-arm64.yaml
$ kubectl -n openfaas get deployments -l "release=openfaas, app=openfaas"
NAME                READY   UP-TO-DATE   AVAILABLE   AGE
nats                1/1     1            1           119s
queue-worker        1/1     1            1           119s
basic-auth-plugin   1/1     1            1           119s
alertmanager        1/1     1            1           119s
prometheus          1/1     1            1           119s
gateway             1/1     1            1           119s
faas-idler          1/1     1            1           119s
Now it is time to create and start your first serverless function:
- Login to your openfaas gateway
$ export OPENFAAS_URL=http://192.168.64.12:31112
$ OF_PW=`echo $(kubectl -n openfaas get secret basic-auth \
  -o jsonpath="{.data.basic-auth-password}" | base64 --decode)`
$ echo $OF_PW | faas-cli login --password-stdin
$ faas-cli list
$ faas-cli version
  ___                   _____           ____
 / _ \ _ __   ___ _ __ |  ___|_ _  __ _/ ___|
| | | | '_ \ / _ \ '_ \| |_ / _` |/ _` \___ \
| |_| | |_) |  __/ | | |  _| (_| | (_| |___) |
 \___/| .__/ \___|_| |_|_|  \__,_|\__,_|____/
      |_|

CLI:
 commit:  c9d284d0c5bd90415baf9130fdce55af8e5a506b
 version: 0.12.19

Gateway
 uri:     http://192.168.64.12:31112
 version: dev
 sha:     9fccc1c84d6aac67c5e4657cfdcd0a5cdff3babf
 commit:  Update semi-automatic arm builds


Provider
 name:          faas-netes
 orchestration: kubernetes
 version:       0.12.9
 sha:           c402b912ce21f0bf01bc3aa45ebc330decc41ac5
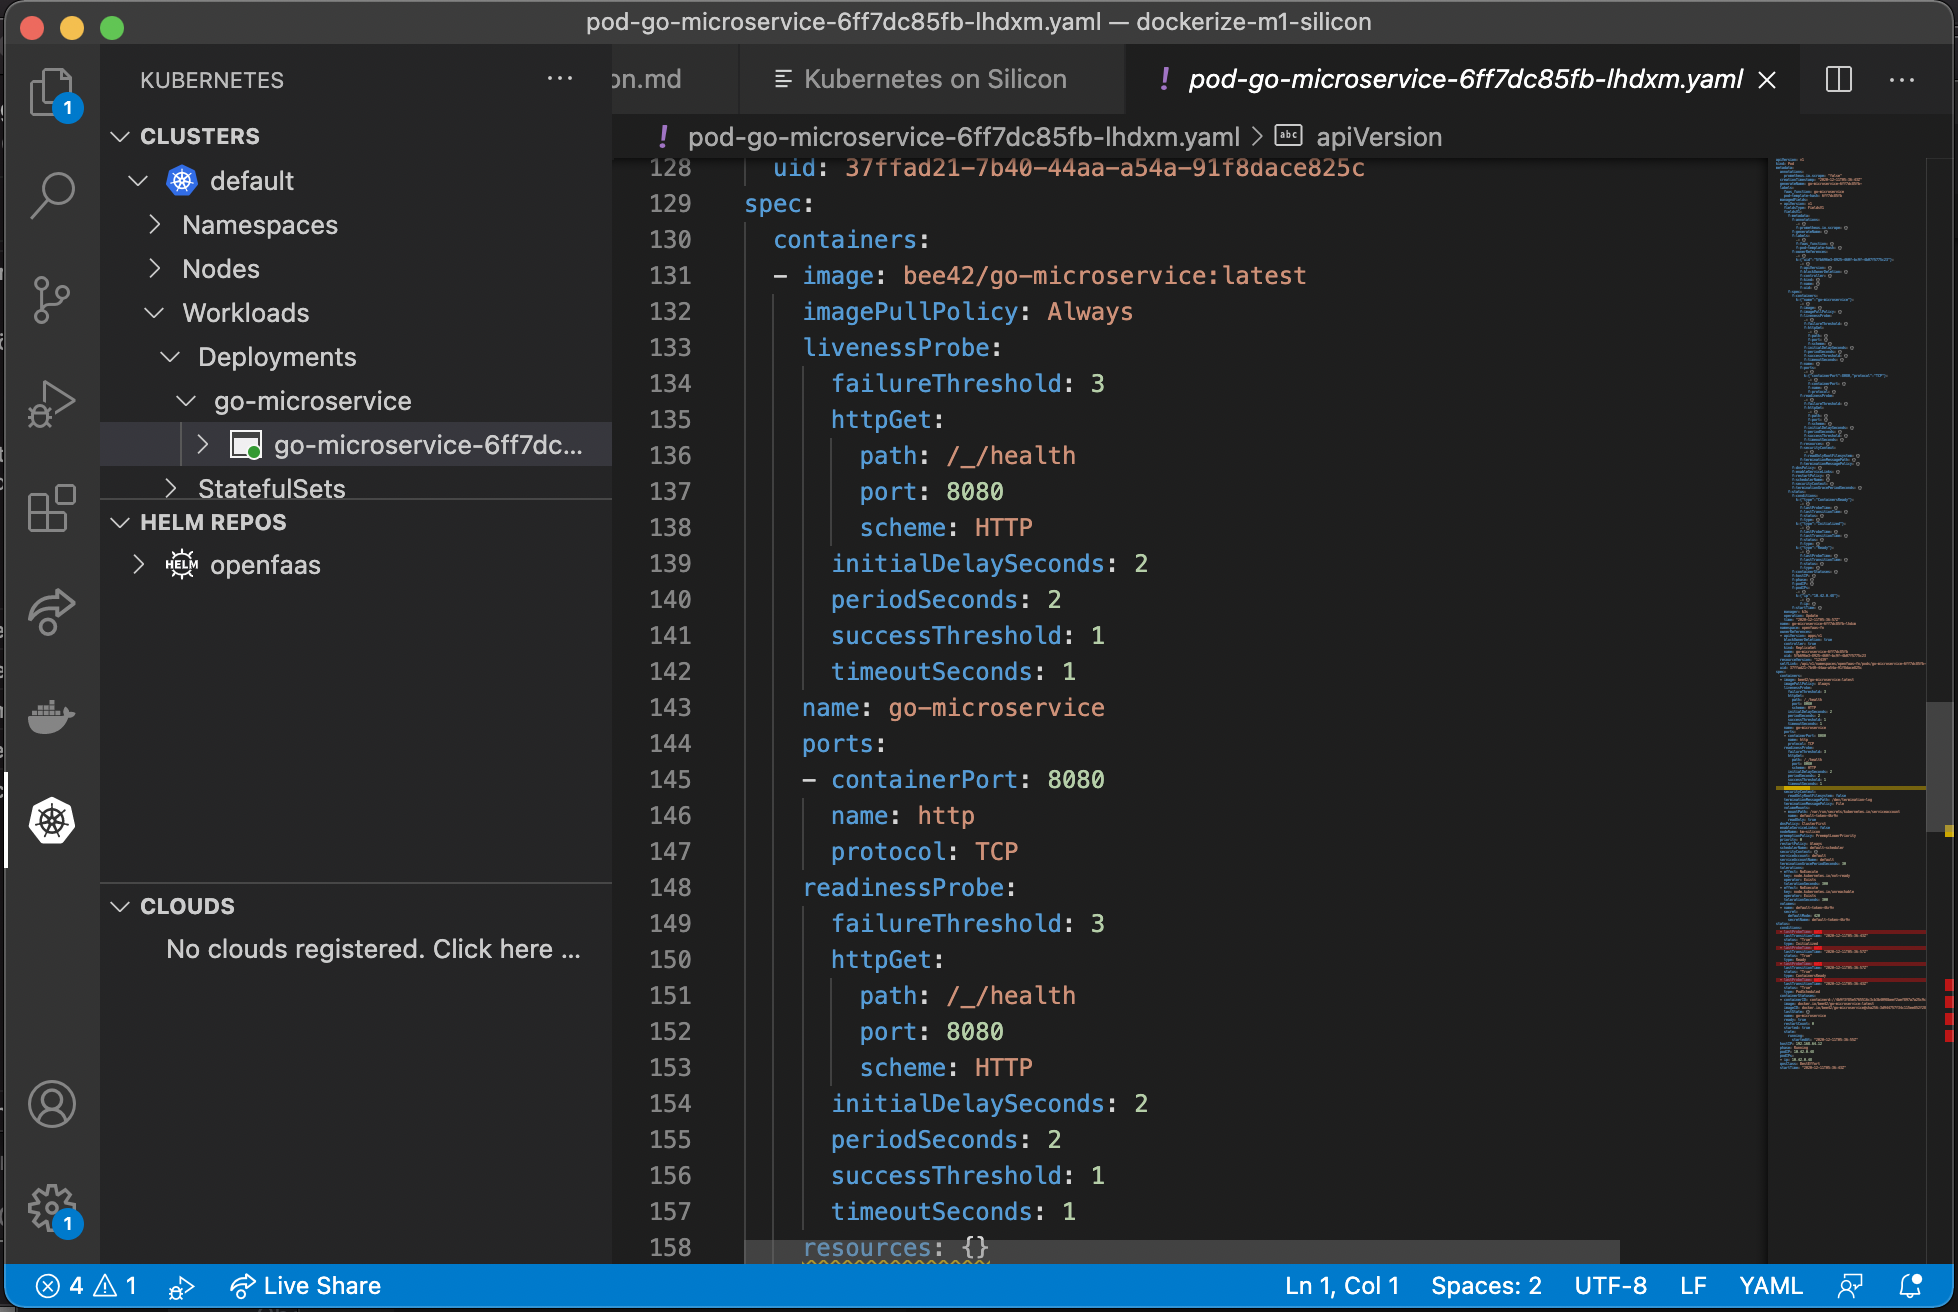
- Create your function
$ mkdir -p functions && cd functions
$ faas-cli new --lang dockerfile go-microservice
$ vi go-microservice.yml
version: 1.0
provider:
  name: openfaas
  gateway: http://127.0.0.1:8080
functions:
  go-microservice:
    lang: dockerfile
    handler: ./go-microservice
    image: bee42/go-microservice:latest
# the faas-cli use the OPENFAAS_URL
$ docker login --username bee42
# password
$ faas-cli up -f go-microservice.yml
$ curl -i $OPENFAAS_URL/function/go-microservice
HTTP/1.1 200 OK
Content-Length: 0
Date: Fri, 11 Dec 2020 05:39:18 GMT
X-Duration-Seconds: 0.002211
Summary
Kubernetes on your Silicon is possible, but the installation is a little tricky. Sometime you need to adjust the config or set up the ARM support manually. You can also add multiple Kubernetes cluster nodes. Sometimes when you restart the VM the IP address is changed. In these cases you need to patch your ssh config and kubeconfig with the correct address.
A more convenient solution is on the way.
Docker announced a native preview on Docker Desktop 3.0 M1 Silicon edition at 2020/12/11.
There is currently a problem with DNS and Kubernetes require it. Another mission has started!
If you can’t wait, follow this alternative installation approach. One of the coolest things ever is that the Kubernetes setup described uses less power. I can now hack for more than eight hours without recharging the battery.
HINT:: Please do not hack eight hours without several breaks!
The new Silicon enjoys my cloud native life. Now it’s time to take a longer break.
Stay safe!
Regards,
Peter (pathfinder)
Install helm on your km-silicon VM
Use the ubuntu snap package installer
$ snap install helm
or
install helm tool manually on the box
$ curl -sL https://get.helm.sh/helm-v3.4.2-linux-arm64.tar.gz -o helm-v3.4.2-linux-arm64.tar.gz
$ tar xzf helm-v3.4.2-linux-arm64.tar.gz
$ export PATH=`pwd`/linux-arm64/:$PATH
$ mkdir -p ~/.kube
$ cp /etc/rancher/k3s/k3s.yaml ~/.kube/config